Having Issues Uploading Node Js Onto Raspberry Pi 3
![]()
This article has been updated to cover the installation of both Raspbian Buster and the latest version of Node at the time of this writing which is Node 17.x.
In this installment of our LTM (Learning through Making) series of Node.js tutorials, we're going to get Node up and running on a Raspberry Pi 4 (or Pi 3 or Pi two). I'grand focusing on the Raspberry Pi 4/Pi 3/Pi 2 rather than older versions such as the Raspberry Pi Model B+ since these are the latest models at the time of this writing. The Raspberry Pi four, for example, sports a 1.5 GHz quad-core ARMv8 chip with RAM options of 4 GB, ii GB, or ane GB versus the Raspberry Pi 1 Model B+'s 700 MHz single-core ARMv6 flake with 512 MB RAM.
The instructions provided hither are for installing Node.js on a Pi 4 Model B, Pi 3 Model B+ or PI three Model B (all running ARMv8), or Pi two (ARMv7) rather than other models based on the ARMv6 chip such as the Raspberry Pi i Model B, Raspberry Pi Model B+ or the Raspberry Pi Zero. A bulk of this installation guide should nevertheless prove useful for other Raspberry Pi systems besides the Pi 4/ Pi 3/Pi 2; however, the final steps focused on the installation of Node.js will not work for these systems based on the older ARMv6 architecture.
If yous are interested in creating a slimmed down Raspberry Pi system without a graphical user interface, see my commodity on creating a lightweight Raspberry Pi with Raspbian Lite.
This tutorial is useful for anyone wishing to successfully install a Raspberry Pi four/Pi three/Pi ii arrangement, even if they are non interested in Node.js since the Node.js installation happens in the terminal steps of the tutorial. But, why would you non want to install Node.js? 🙂 Permit's get started!
Table of Contents
 Hardware Needed
If you lot don't currently own a Raspberry Pi, the easiest manner to get started is to buy a starter kit such equally this one on Amazon:
- CanaKit Raspberry Pi 4 4GB Starter Kit – 4GB RAM (or purchase the two GB RAM model or the 1 GB RAM model)
Note: my affiliate info is included on Amazon links so you lot can, if you desire, support these tutorials while paying zilch extra.
We'll need the following items to get started:
- Raspberry Pi 4 Model B, Pi 3 Model B+, Pi 3 Model B, or Pi 2 Model B (these are the official names for the Raspberry Pi 4, Pi 3, and Pi two.Don't let the "B" confuse you since there is also an older Raspberry Pi Model B which is now effectively the "Raspberry Pi 1 Model B".)
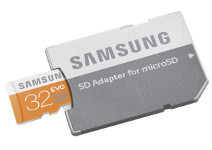
- MicroSD card (I recommend a grade 10 carte that is 16 GB or higher. I like this Samsung 32GB EVO Plus Class ten Card.)
- MicroSD to SD memory bill of fare adapter (and so yous tin utilise the SD carte reader on your laptop/desktop to write to the microSD card. Many microSD card vendors include this SD adapter with the purchase equally shown here.)
- Micro USB power supply (ii.5A or greater recommended) to power the Pi.
- (Pi 2 only) USB WiFi adapter (or Ethernet cable if preferred. I have tested this Edimax USB WiFi adapter on Raspbian and information technology works great out of the box. There's a reason this is a all-time seller on Amazon.) This is not needed for the Pi iv/Pi 3 since these systems include built-in WiFi.
- Windows laptop/desktop (Linux or Mac works not bad too, merely this tutorial is geared more toward Windows machines so some readers will need to adapt.)
- HDMI monitor/USB keyboard/mouse (Y'all tin borrow these from another system temporarily and then run your Pi in a headless mode every bit I will explain subsequently.)
Once yous have gathered the needed hardware, we are ready to bring our Pi machine to life!
Write Raspbian Epitome to SD Carte du jour
We will be running Raspbian which is a free operating system based on Debian Linux and optimized for the Pi. Here we go:
- Download the latest Raspbian image from https://www.raspberrypi.org/downloads/raspbian/. Be sure to download one of the desktop versions (
"Raspbian Buster with desktop" or "Raspbian Buster with desktop and recommended software") rather than the "lite" version. I recommend downloading the smaller version ("Raspbian Buster with desktop") since you tin can always add other software packages later if needed. The download for the smaller desktop version is a zip file that is approximately 1.2 GB and then it may accept some time to download depending on the speed of your Cyberspace connection. - Insert the microSD card into the SD adapter as shown in the Samsung sample moving picture above.
- Insert the SD adapter in the SD bill of fare reader on your laptop/desktop. Make sure it is seated well in the connectedness.
- Launch Windows Explorer and verify that the SD bill of fare registers as a drive on your system. Make a note of the drive alphabetic character every bit you will need information technology soon.
- Download and install Etcher. Etcher is a cross-platform (Windows, Bone X, Linux) tool for flashing images to SD cards. It has many prissy features including a simple user interface, the ability to flash an image without unzipping the goose egg file, and a validation step to verify the SD card epitome was written correctly to the SD card.
- (As an culling for Windows users, y'all tin can use Win32 Disk Imager since it also provides the ability to read an SD bill of fare and create an image file which is handy for creating snapshots of Raspberry Pi systems that can flashed dorsum to an SD card later if needed. For Win32 Disk Imager, you will demand to get-go unzip the downloaded goose egg file before burning the .img file to the appropriate drive letter containing your SD menu.)
- Launch Etcher. Be patient as Etcher takes a number of seconds to launch. When launched, the interface will look something like this:
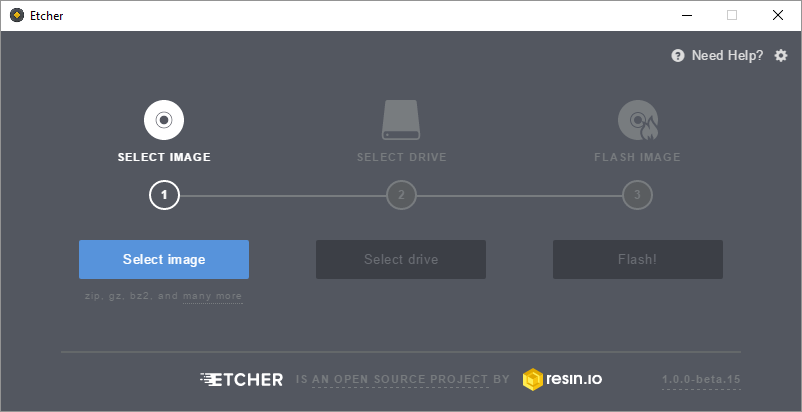
- Click the Select epitome button and navigate to the Raspbian cypher file that you lot downloaded. (It does Non need to exist unzipped before flashing.)
- Click the Select drive button to specify the target device location of the SD card.
Alarm: Exist sure you choose the right target device, or you volition write the image to another drive on your system and this will not be good. - Click the Flash!button to write the epitome to your SD menu.
- If yous are running Windows, you may be presented with a security prompt regarding making changes to your device. If and then, click Yes to proceed.
- After the paradigm is written to the SD menu and verified, Etcher will automatically dismount your SD menu so it tin can be safely removed.
- Remove the SD adapter from your laptop/desktop and remove the microSD card from the SD adapter.
Prep the Hardware
See the Raspberry Pi 4 Tech Specs page for a diagram showing the diverse parts of the Pi 4. As well, you will notice a diagram of the Pi ii hither (the Pi three looks very similar). These diagrams may assist you in this section. Allow's go this picayune SBC (unmarried board figurer) ready to boot! Here are the steps:
- Insert the microSD carte du jour into the Pi. (Plough the Pi upside down. The microSD card slot is located on the side opposite of the USB ports. This short video explains the process well.)
- Connect the USB keyboard and mouse
- Connect the HDMI cable
- Connect the USB Wi-Fi adapter (or Ethernet connectedness if you are not using Wi-Fi) This footstep is not necessary if yous are using a Raspberry Pi iv/Pi 3 model which has on-board Wi-Fi.
- Connect the power supply (Yous will run across the Pi lights come on and power upwards.)
- You should now meet Raspbian booting on the screen. Hooray!
Configure the Pi
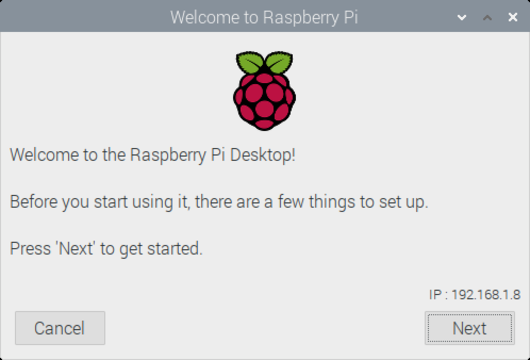
Raspbian now includes a setup wizard that launches on beginning boot, making information technology easier than ever to gear up our Pi. After booting Raspbian the first fourth dimension, you will exist greeted with the following dialog box:
Note: If you need to run the setup wizard at a time to come time (since it only launches on first kicking), issue the following control from the terminal (we'll discuss how to launch the last afterward in the Apply Raspbian Updates section of this tutorial):
$ sudo -E piwiz
Printing the Side by side button. I won't keep telling you to press the Next button, but it is implied as I show each screen in the setup wizard.
Enter your country, language, and timezone to ensure your keyboard and other localization settings work as expected for you:

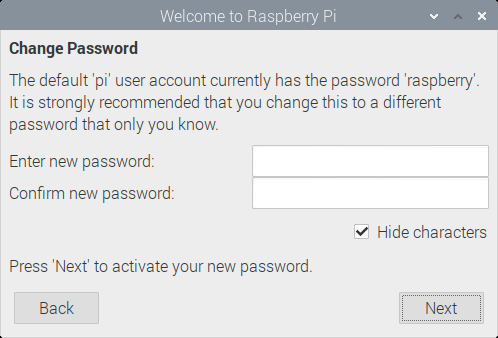
It'southward a good idea to change the default password for the "pi" user. Just make certain you don't forget it. 😉
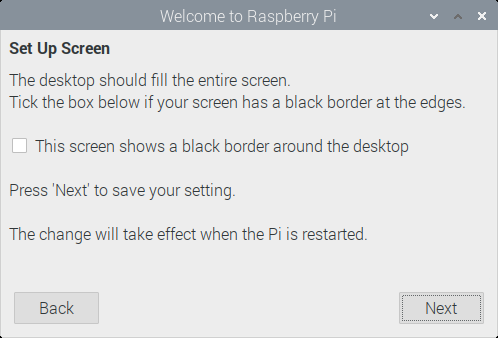
In this tutorial, I'm showing you how to build a "headless" Pi arrangement that you tin can remote into without a dedicated monitor and then just press the Adjacent button unless y'all will be connecting it to a monitor and you have a need to cheque the box based on observations:
Select your WiFi network from the list. When you printing Next, you lot volition be prompted to enter your WiFi network countersign:

Press the Next button to update your software (or see the alternative step immediately below). It is a good idea to ensure you lot have the latest versions of software including security updates.
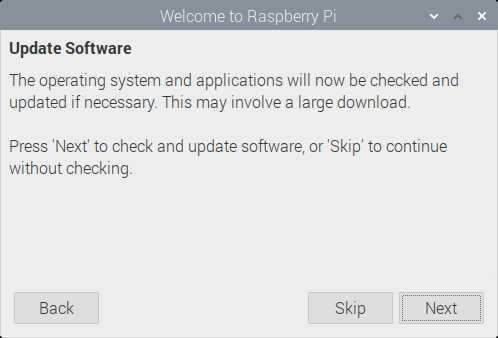
Alternative step for updating software
The "Update Software" dialog box is handy, but it does non provide detailed feedback (i.e. bytes remaining to download) for ane to ascertain how long the update process volition take. This is peculiarly problematic for those who have slow Cyberspace connections. As an alternative step for updating software, press the Skip button and follow the directions in the Utilise Raspbian Updates section farther down in the tutorial.
Back to our regularly scheduled programme…
The initial setup is complete. Printing the Later on button (rather than the Restart button) since we take at to the lowest degree one more change to make before restarting:

We need to brand at least i more than alter to the Pi for the purpose of personalizing it for our use. To become started, launch Raspberry Pi Configuration which is located in the Bill of fare under Preferences.
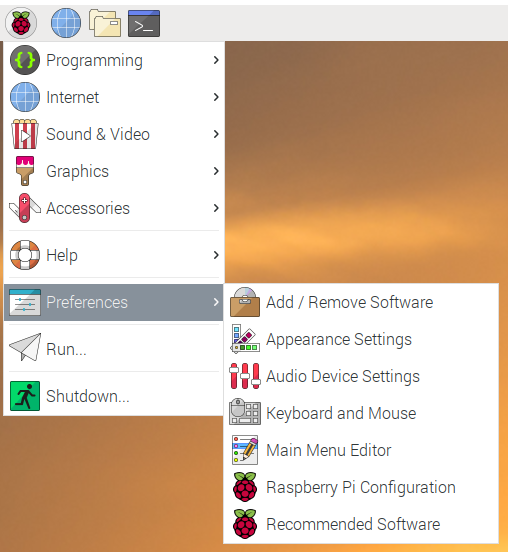
This will launch the Raspberry Pi Configuration utility, a handy graphical version of the console-based raspi-config program that was used for many years to configure the Pi (and is actually nevertheless used behind the scenes by this graphical version). The post-obit window will appear:
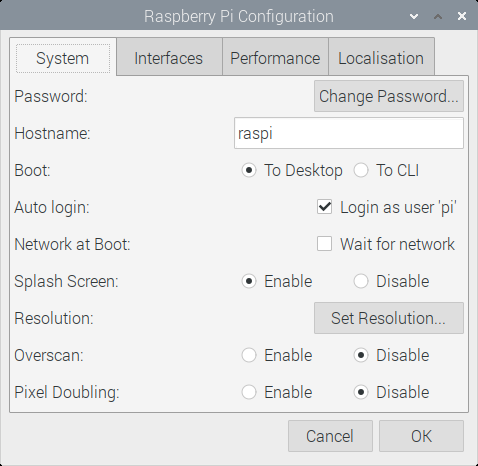
Change the host name from the default of "raspberrypi" to something shorter such as "raspi" or something fun and personal to you.
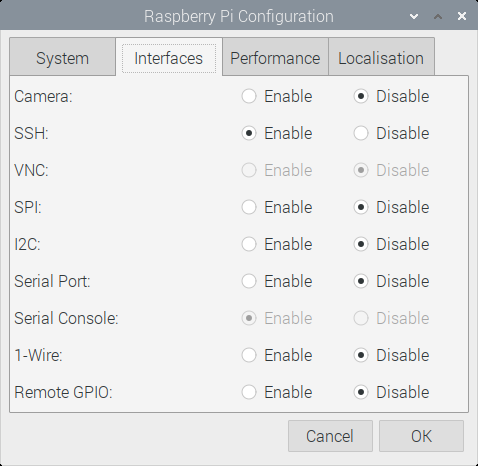
A little farther down in this tutorial, we volition configure the Pi and then we tin can remote into it with Remote Desktop. While you are in the Raspberry Pi Configuration tool, you can as well enable SSH equally another avenue to connect to your Pi. To enable SSH, press the Interfaces tab and alter SSH to Enable if it is not already enabled:
Printing the OK button and select Yep to reboot your Pi when prompted.
Apply Raspbian Updates
If you did not already use the Raspbian updates using the setup wizard above (or you are visiting this tutorial after and want to know how to go on your Pi upwards to engagement), follow the instructions in this section.
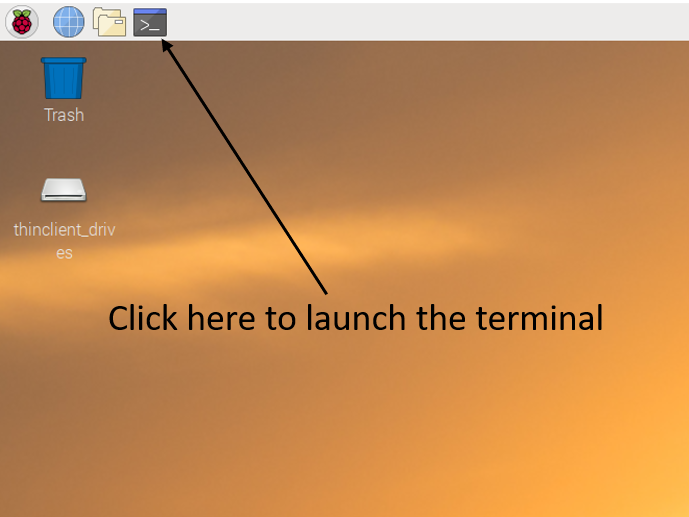
First, launch the terminal:
From the terminal, issue a ping command to verify your network connexion is working:
$ ping -c 5 google.com
We're now ready to ensure our system is up to date with security patches.
Nosotros volition first run the apt "update" command. This command will not really update whatsoever software on the system but will download the latest package lists from the software repositories and then that Raspbian will exist enlightened of all new software available along with dependencies. Issue the following command at the "$" prompt:
$ sudo apt update
Next, run the post-obit command to upgrade any packages installed on your system that need upgrades:
$ sudo apt full-upgrade -y
This is important to keep your Pi system synchronized with security updates, etc. These two commands should exist issued together and run periodically.
Set up Remote Desktop
We want to run our Pi remotely without requiring a dedicated HDMI monitor and USB keyboard/mouse. This is known equally headless mode. We will be using the xrdp package to accomplish this goal. Newer versions of Raspbian (starting with versions that transport with the PIXEL desktop surround) send with RealVNC for remote connections. Unfortunately, RealVNC does not work well in headless mode since it degrades to a very low resolution, and there is quite a chip of ceremony required to change the resolution. The xrdp solution automatically scales our desktop resolution and makes our life much easier. Let's practise information technology:
- Before we tin install xrdp, we must commencement install the tightvncserver parcel. The tightvncserver installation will also remove the RealVNC server software that ships with newer versions of Raspbian since tightvncserver (xrdp) will not work if RealVNC is installed. (Thanks to Ryan Hanley for this tip!) Enter the following control in the final:
$ sudo apt install -y tightvncserver
The "-y" option will automatically reply yep to the default questions which is what we want in this context.
- Next, invoke the post-obit command to install xrdp:
$ sudo apt install -y xrdp
- Finally, nosotros need to install the samba packet and then we volition be able to access the Pi by its host proper noun from Windows machines on the network rather than by its IP accost which can change since the Pi receives its IP address via DHCP. (For OS X users, you tin can install Bonjour and so access your Raspberry Pi past host name. For instance, if your host name is "raspi", you tin can access information technology on OS X every bit "raspi.local".) OK, let's install Samba:
$ sudo apt install -y samba
- After this installation completes, y'all should be able to ping the Pi Hostname (configured inRaspberry Pi Configuration programme above) from a Windows automobile:
C:\> ping raspi
- You are now set to launch a remote desktop connectedness!
- From your Windows machine, hit the Windows cardinal, and type "Remote Desktop Connection" to bring up the Remote Desktop programme. Click it in to invoke it. (OS X users can apply Microsoft Remote Desktop which is bachelor for free in the Mac App Shop.)
- Type the host proper name of your Pi ("raspi" in my example) in the Computer textbox.
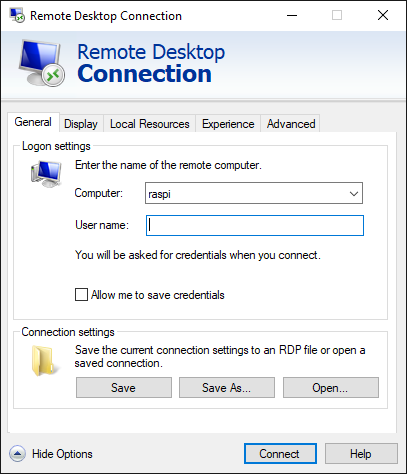
- Next, click the Brandish tab. Move the Display configuration slider all the way to the right to "Total Screen" to ensure our remote desktop connectedness will fill our screen. It may already exist set to "Full Screen".

- Click the Connect button almost the bottom of the dialog box.
- Y'all will then be prompted with the xrdp login screen:
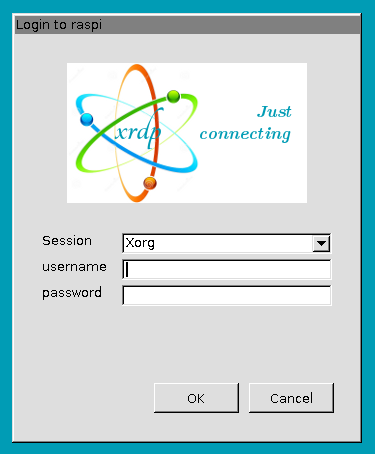
- Enter your credentials and log into the Pi.
- username: pi
- countersign: raspberry (or the new password you assigned using the setup wizard earlier in the tutorial.)
Astonishing! Nosotros are continued remotely to the Pi and we no longer need the dedicated HDMI monitor and USB keyboard/mouse. Permit's go ahead and shut downward the Pi for a minute so we can free upward our monitor and keyboard/mouse:
- Launch a terminal session and enter the following command to cleanly shut down your organization:
$ sudo poweroff
- Wait a infinitesimal for the Pi to fully power downwardly.
- Unplug the power cable, HDMI cablevision, and the USB keyboard and mouse.
- Plug the ability cable dorsum in and the Pi should exist on its manner back up without all of those extra cables!
- After giving the Pi a infinitesimal or so to boot, connect to it once again using the Windows Remote Desktop program.
We can create a Windows file share on the Pi and so that we tin copy files from our Windows machine direct onto the Pi. This can come in handy in many contexts. This is too useful for Os X users since you volition be able to connect to your Raspberry Pi file share from Finder under "Shared". Here's how we do information technology:
- Launch a terminal session.
- Consequence the post-obit command to launch the Leafpad editor.
$ sudo -East leafpad /etc/samba/smb.conf &
- We could have likewise used the console-based "nano" editor, just Leafpad provides a GUI which is more than suitable for beginners. The ampersand on the terminate of the command launches Leafpad as a background process then we are returned to a shell prompt in the terminal. Likewise, the smb.conf is office of the Samba packet nosotros installed earlier and this is why it exists on our system.
- Whorl downwardly to the very bottom of the smb.conf configuration file and add the post-obit (or copy and paste from this tutorial):
[PiShare] comment=Pi Share path=/home/pi browseable=yes writeable=yeah only guest=no create mask=0740 directory mask=0750 public=no
- Salvage the changes to the smb.conf configuration file and exit the Leafpad editor. (Raspbian will automagically restart the SMB (Samba) services based on the changes yous made to the configuration file.)
- Back in a last session, we demand to create an SMB (Samba) user so we can connect securely from Windows. We will create a user named "pi", but this will exist an SMB (Windows user) rather than the Raspbian "pi" user. Here's how we do it:
$ sudo smbpasswd -a pi
Y'all will be prompted to enter and re-enter a password. Document this countersign somewhere for future reference.
We are set up to connect to our newly created Pi file share from Windows!
- Back on your Windows machine, blazon the Windows central and "R" (Win-R) to launch a run box for typing in commands.
- Enter two backslashes followed past the proper noun of your Pi machine (i.e. your Hostname) and hit enter. For instance:
\\RASPI
- (Please note that when connecting to the file shares through Windows 10, the host proper name hither tin can be entered in lower case or upper case.)
- When prompted for credentials, enter the following:
- Username: The format to enter here in Windows parlance is the domain\username. For us, our domain will exist our Pi hostname and our user name will be "pi". Therefore, we will enter: raspi\pi
If your Hostname is not raspi, yous will obviously enter that instead. - Countersign: (enter the password yous created with the smbpasswd control above)
- Username: The format to enter here in Windows parlance is the domain\username. For us, our domain will exist our Pi hostname and our user name will be "pi". Therefore, we will enter: raspi\pi
- Voilà! Nosotros should at present be connected. Double click the PiShare folder to launch the file share you merely created. You will as well see a folder called pi that provides read-only admission to your entire abode directory.
- You can test your newly created file share by creating a text file on the Windows side and verifying that it shows up in the /home/pi directory on the Pi side.
- In Windows, yous can besides map a drive to the file share you lot just created as follows:
Install Node.js
Yous now have an amazing general purpose Raspberry Pi organisation that can be used for a diversity of tasks and inter-operates well in the Windows earth (it even looks like a Windows machine to the other Windows machines!) – and can play nicely in the Mac and Linux world too. Permit'south get alee and install Node.js and then nosotros will be fix to do some fun projects in the future. Here are the steps:
Our friends at NodeSource host and maintain some excellent Node.js binary distributions. We will leverage a command they have written to add another packet repository to our Pi so that nosotros will exist able to "apt install" a modern version of Node.js from their repository. This is beneficial since the Debian/Raspbian versions may not always be up to date. By adding the NodeSource repository, we will also exist able to receive updates rather than just installing a standalone (.deb) file version of Node that cannot be updated hands.
Annotation: As described at the beginning of this commodity, this final section of the tutorial related to the installation of Node.js requires a Pi system based on the newer ARMv7 or ARMv8 chip such equally the Pi iv/Pi three/Pi two. NodeSource provides Node.js binaries for these newer ARMv7+ architectures, but non for Raspberry Pi systems based on the older ARMv6 architecture such as the Raspberry Pi Model B/B+ or the Raspberry Pi Zero.
Read the writing carefully on your Raspberry Pi circuit board to confirm it indicates something like "Raspberry Pi iv Model B" or "Raspberry Pi 2 Model B". If in doubtfulness, run the following control in the terminal:
$ uname -mIf the outcome returned starts with "armv6", yous are running a Raspberry Pi based on the older ARMv6 chipset and the next Node.js installation step will non work; otherwise, you are set for the adjacent step.
Here we go in the final stretch! Let's proceed with an installation of the latest version of Node at the moment which is Node 17.9.0.
$ curl -sL https://deb.nodesource.com/setup_17.x | sudo -E bash -
The previous command updates our Debian apt package repository to include the NodeSource packages.
Annotation: It's generally a good idea from a security perspective to know what commands you are invoking on your system, especially since the command higher up invokes the script as the root user. If you desire the technical details backside this script, you can launch the URL (https://deb.nodesource.com/setup_17.x) in your browser and review the lawmaking. The script carries out some ceremony to determine the Linux distribution y'all are running and instructs the Debian apt package system to add the NodeSource package repository as a trusted source for obtaining Debian packages. This enables us to install Node.js now and upgrade to more recent versions of Node.js when they become bachelor.
Now that we accept added the NodeSource package repository, we tin move on and install Node.js!
$ sudo apt install -y nodejs
We can then test and run across what version of Node we are running and launch the Node REPL every bit we discussed in the previous commodity as a quick exam to confirm the installation was successful.
$ node -five v17.9.0 $ node > 1 + 3 four > # Nosotros can hit Ctrl-C twice to exit the REPL and get back to the fustigate (crush) prompt.
Next Time
In a future post, we will leverage the goodness of the npm (Node Package Managing director) community and build a uncomplicated, merely highly functional Spider web server without any code. This tin can be achieved using the Raspberry Pi organisation you only created here or on a Windows/Linux/Mac machine as I outlined in a previous article. Hope to see you lot so!
Follow @thisDaveJ (Dave Johnson) on Twitter to stay up to date on the latest tutorials and tech articles.
Related Manufactures
Create a Lightweight Raspberry Pi with Raspbian Lite
Learning through Making – Getting Started with Node.js
Upgrading to more recent versions of Node.js on the Raspberry Pi
Create a Web Server in Node without any Code
Make Your Raspberry Pi Spider web Server Available on the Internet with Node.js
Controlling a Raspberry Pi from a Mobile Device with Bonus Carte du jour Too
Source: https://thisdavej.com/beginners-guide-to-installing-node-js-on-a-raspberry-pi/
0 Response to "Having Issues Uploading Node Js Onto Raspberry Pi 3"
Enregistrer un commentaire